Hi Everyone!
Today, I am helping to wish the owner of Annie's Paper Boutique, Home of Trendy Twine,
**LESLEY**
a Happy, Happy Birthday!!!


I knew I wanted to include two things on Lesley's card, a coffee treat of some sort, even though she prefers the cold kind and PINK!
So I colored this sweet girl, Latte Lucy (C.C. Designs) with copic markers and paper pieced her dress in pink polka dots. Then I fussy cut her out and layered her on a die cut rectangle. Next, I used a paper stack that highlights all pinks, grays and mint green colors and followed a card sketch. I added some Watermelon Taffy Trendy Twine to the left side of the rectangle and added two heart buttons finished with a bow and knot. Then I die cut the 'happy birthday' 4 times to layer it and added some Spun Sugar distress ink to the top portion of the sentiment. I finished the card off with some Simply White crystal Nuvo drops and some Wink of Stella clear glitter to her hearts and headband.  
I hope Lesley just loves her card and has an amazing birthday!! 

Thanks for stopping by!
Don't forget to visit the Trendy Twine blog to wish Lesley a Happy Birthday and to see all of the cards made to help celebrate her!
Have an amazing day!! 


Products Used:
Stamp- Latte Lucy (C.C. Designs)
Ink- Tuxedo Black Ink (Memento), Spun Sugar distress ink (Ranger), Copic Markers
Dies- Zig Zag Stitched Rectangle Stax die (MFT), Sentiments Three Die (Spellbinders)
Paper- The Mint Berry stack (The Paper Studio), Green card stock (The Paper Studio)
Other- Heart Buttons, Simply White Crystal Nuvo Drops, Glossy Accents, Wink of Stella Clear glitter brush pen

Hi Everyone! 
Today I am a Guest Designer for Die Cuttin Divas.

This week's Challenge is Random Act of Kindness
(Do Something Nice Day).

For my projects, I made some cards and matching tags to give to some fellow teachers, with some coffee cups filled with treats.


 The first set I used purple as my inspiration. I layered some purple die cut nesting hearts from some dies I purchased off Amazon. The smallest heart, I stamped and heat embossed the sentiment from a Hero Arts Kindness stamp set, popped it up and added some clear sequins and a little bit of Trendy Twine to match. Next, I die cut a heart tag from the Tiny Tags die set from Lawn Fawn and heat embossed a coordinating sentiment, then added it to the coffee cup I filled with some yummy treats.


The next card, I used the Peony Bouquet stamp set from Altenew and watercolored the flowers after I stamped and heat embossed them in clear. The sentiment is from the same Hero Arts Kindness set. I also die cut the panels from a Mama Elephant set for both cards. I finished the card with some wink of stella glitter brush pen on the flowers and some clear sequins. The tag is also from the Tiny Tags dies and stamped/heat embossed with the coordinating stamp set.


Thank you so much for stopping by!
Make sure to stop by the Die Cuttin Divas Blog to join the challenge, brighten someone's day, and be inspired by the Design Team.
Thank you to the Divas for letting me be a Guest Designer.
Have a wonderful day!! ♥

Products Used:
Dies- Nesting Hearts (Amazon), Basic Set Dies (Mama Elephant), Tiny Tags (Lawn Fawn)
Stamps- Peony Bouquet (Altenew), CM171 (Hero Arts), Tiny Tags Sayings (Lawn Fawn)
Ink- Versamark ink, White and Clear embossing powders, Versamark Onyx Black ink, Zig Clean Color Real Brush pens 
Paper- Bristol Smooth paper, Neenah Solar white 110# card stock, Teal and Purple card stock (Recollections)
Other- Sparkling Clear Sequins (PPP), Wink of Stella glitter brush pen, coffee cups (IKEA), Cello Bags, Totally White and Grape Fizz Trendy Twine


Hi Everyone!
Today I am sharing a project for Pink and Main stamps and dies.

(This blog post contains affiliate links. Compensated affiliate links used when possible at no extra cost to you. I just receive a small portion of the sales through your purchase. So Thank You!!)

I'm sad to say that this will be my last post as a Pink and Main Design Team member. I started a new full time job in August as a Middle School classroom monitor and I just don't have the extra time right now but I have really enjoyed the privilege of being part of the team.


Now onto my card, I used the new Autumn Blessings stamp set along with the coordinating Autumn Blessings die and Pumpkin Spice 6x6 paper pad.
I started with a dark brown card base, I die cut a cream colored panel with the Stitched Rounded Squares die and stamped the cute boy and girl mice and sentiment "When I count my Blessings I count you twice" all in brown ink. Next, I copic colored the mice and paper pieced the apron and cuffs of the girl mouse. I also stamped, colored and die cut the pie from the set for them to hold. To the card base, I added a panel of patterned paper from the 6x6 pad and also some orange patterned paper that is die cut from the Scalloped Border die and added to the bottom of the first panel. Next, I stamped the "Happy Thanksgiving" sentiment in brown ink to another strip of orange patterned paper and added it to the bottom after I put some coordinating twine on it. I also added a hand cut flag banner to the top left of the card also decorated with some twine.


Thank you so much for stopping by!
Make sure to join the current
Pink and Main Challenge: Autumn.
I hope you have a wonderful day!! 

Other Supplies Used:
Paper- Chocolate Chip card stock (SU!), Cream card stock (Recollections)
Ink- Rich Cocoa ink (Memento), Copic markers, White gel pen
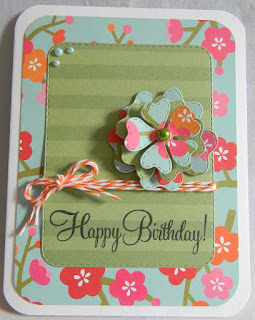
Other- Spiced Pumpkin Trendy Twine
Hi Everyone!
I hope you are having a wonderful week so far.
Happy First Day of Fall!! 
I am so ready for it this year.
Today, I am sharing a card inspired by the current My Favorite Things card sketch challenge #351.

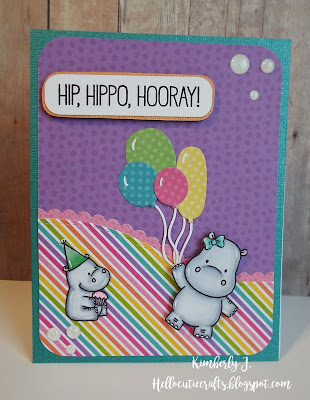
For my card, I wanted to use two new products that I received recently. The cute Happy Hippos (MFT) and the Fairy Tales 6x6 paper (Doodlebug Designs).


I stamped and colored the two hippos with black ink, then colored them with copic markers. Next, I fussy cut them out. Then I used the Fairy Tales paper for the card layers. I used the Scallop Waves Die (Pink and Main stamps) and rounded the corners with a 1/2 in corner chomper (WRMK). Next, I stamped the sentiment in black ink and hand cut it out then layered it on some Orange cardstock (Bazzill) and foam mounted it. I die cut some balloons with the Birthday Balloons die (MFT) from some coordinating dotted patterned paper (The Paper Studio) and the strings from white card stock. Then, I added some white gel pen accents and finished the card off with some Lily White glitter sprinkles (Doodlebug Designs).


I was so excited to have a few moments to create a card and play along with the challenge.
Thank You so much for stopping by!
Have an amazing day!


Hi Everyone!
Today I am sharing a project for Pink and Main stamps and dies.

(This blog post contains affiliate links. Compensated affiliate links used when possible at no extra cost to you. I just receive a small portion of the sales through your purchase. So Thank You!!)
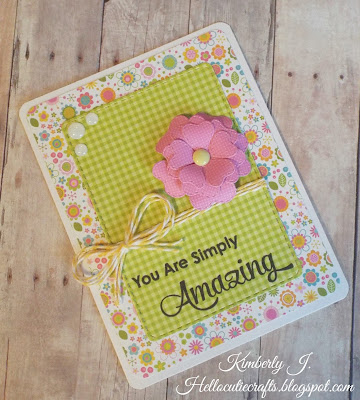

For the card today, I used the new Llamas stamp set and coordinating Llamas die paired with the  Pumpkin Spice 6x6 paper pad. I started with a standard A2 card base made from kraft card stock. Then I die cut a Stitched Circle die from some brown patterned paper from the 6x6 pad, along with two coordinating strips. Next, I stamped the resting Llama in rich cocoa ink then in versamark ink and heat set it with clear embossing powder and colored the Llama with distress inks. Finally, I die cut the Llama with the coordinating die. I added all the layers to the card front and then stamped the sentiments from the same set, they are just so punny!! I finished the card with some gold sequins.


Thank you so much for stopping by!
Make sure to join the current
Pink and Main Challenge: Autumn.
I hope you have a wonderful day!! 

Other Supplies Used:
Paper- Kraft card stock (The Paper studio), Tim Holtz Water color card stock
Ink- Rich Cocoa ink (Memento), Versamark ink, clear embossing powder, Distress inks
Other- Sequins
Hi Everyone!
Today, I am sharing a project as a Guest Designer for
Gerda Steiner Designs.
(This blog post contains affiliate links which adds no costs to you but helps me out! So Thank you!!)

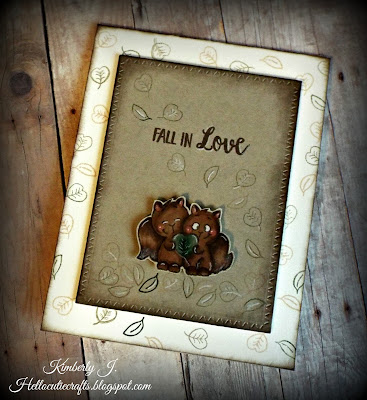
I am using the Fall In Love 4x6 stamp set,
so fun and perfect for all those fall cards and projects.

 
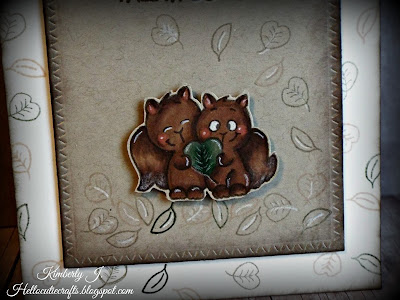
For the card, I started out with a cream colored top folding A2 card base made from 110# cream card stock from Recollections. I stamped the two separate leaves from the stamp set in three ink colors: Desert Storm (Memento), Crumb Cake and Always Artichoke (SU!) inks. Then I sponged the edges with the Crumb Cake Ink. Next, I stamped the cute squirrel couple on Crumb Cake card stock (SU) in Rich Cocoa ink (Memento) then colored them in with copic markers with some white color pencil accents, then fussy cut them out. Then I die cut a rectangle using the Zig Zag Stitched Rectangles dies (MFT) out of crumb cake card stock and stamped the sentiment "Fall In Love" in rich cocoa ink as well as, the leaves then I popped up the rectangle on the card base with foam adhesive and the cute squirrel couple to finish off the card.

Thank you so much for stopping by today!
I am so excited to be a Gerda Steiner Guest designer again! 
Thank you to the whole GSD team!!
Make sure to check out this amazing new Fall set,
Fall In Love.
Have a wonderful day!


Hi Everyone!
Today I am sharing a project for
Pink and Main stamps and dies.

(This blog post contains affiliate links. Compensated affiliate links used when possible at no extra cost to you. I just receive a small portion of the sales through your purchase. So Thank You!!)


For the card today, I used the newly released Fall Bouquets stamp set and coordinating Fall Bouquets dies and Pumpkin Spice 6x6 paper pad. I started the card with a top folding A2 cream colored card base, then I picked two patterned papers from the 6x6 paper pad and the cream cardstock, layered them and die cut them out of the largest Stitched Rounded Rectangle die. Then I stamped the pretty flowers and bird from the Fall Bouquets stamp set in rich cocoa ink, then in versamark ink and heat embossed it with clear embossing powder, so that I could do some Distress ink watercoloring. When the image was dry, I die cut it with the coordinating die. Next, I stamped the "Thankful for you" sentiment with the rich cocoa ink on the layered panel. Then, I added some coordinating Trendy Twine to the panel and added fun foam to the back of the panel and adhered it to the card base. I finished the card with a few enamel dots.


Thank you so much for stopping by!
Make sure to join the current
Pink and Main Challenge: Autumn.
I hope you have a wonderful day!! 

Other Supplies Used:
Paper- Cream card stock 110# (Recollections), Tim Holtz water color card stock
Ink- Rich Cocoa ink (Memento), Distress inks (Ranger)
Other- Spiced Pumpkin Trendy Twine, Enamel dots
Hi Everyone!
I hope you are having a great day so far.
(This blog post contains affiliate links which adds no costs to you but helps me out! So Thank you!!)

Today I am sharing a card featuring a *NEW* Gerda Steiner Designs stamp set: Fall In Love.


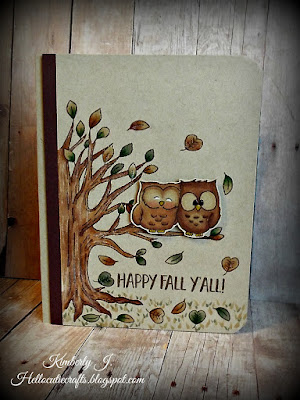
For this card, I started with a crumb cake (SU!) side folding card base. I took another piece of crumb cake card stock and stamped the tree, leaves and sentiment all in Rich Cocoa ink (Memento) then copic colored the images. I also stamped the cute Owl couple from the set and copic colored them and fussy cut them out to pop up on the tree branch. I added a strip of chocolate chip card stock to the edge of the panel once I cut it down for the card front. I round the two corners then layered everything. I finished the card with some white prismacolor pencil accents and some glossy accents to the beak and feet.
Thank so much for stopping by!
Thanks again to the GSD team for having me as a guest!
Also, make sure to check out the new
Fall In Love 4x6 stamp set.
Have a wonderful day!


Hi Everyone!
Today I am sharing a project for Pink and Main stamps and dies.

(This blog post contains affiliate links. Compensated affiliate links used when possible at no extra cost to you. I just receive a small portion of the sales through your purchase. So Thank You!!)

I used the newly released this month, Sticky Note stamp set and the Sticky Note coordinating dies, paired with the Hugs Die and the Be Brave 6x6 paper pad.
The Be Brave papers have such a great masculine and western feel to them, I thought they went perfectly with the fun Cacti in the Sticky Note set. The sentiment is so fun! 


I started the card with a gray card base then added a panel of the chevron patterned paper from the paper pad. Next, I die cut a zig zag border out of navy card stock to layer and match the pattern paper. Then, I added a white panel and die cut the Hugs Die from white to layer on that panel for a tone on tone look. Next, I added the sentiment "Sorry I was Prickly" from the Sticky Note stamp set in black ink. Then I stamped and heat embossed the Cacti from the Sticky Note stamp set in black ink with clear embossing powder on watercolor cardstock and colored those in with Zig Clean Color brush markers. Finally, I die cut the cacti with the coordinating dies and added them to the card front.
I popped up every other cacti on the card front.


Thank you so much for stopping by!
Make sure to join the current
Pink and Main Challenge: School.
I hope you have a wonderful day!! 

Other Supplies Used:
Paper- Watercolor cardstock (Ranger), Navy and Gray card stock (Recollections), Solar White card stock (Neenah)
Ink- Zig Clean Color Brush pens, Onyx Black ink (Versafine) with clear embossing powder (Zing!)
Other- Stitched Border #1 die (Pretty Pink Posh) 

Hi Everyone!
Today I am sharing a project for Pink and Main stamps and dies.

(This blog post contains affiliate links. Compensated affiliate links used when possible at no extra cost to you. I just receive a small portion of the sales through your purchase. So Thank You!!)


I used the just released Happy For You stamp set, Happy For You coordinating dies with the Be Brave 6x6 paper pad and the Stitched Rounded Rectangle die. I started with a top folding A2 white card base, then die cut a white panel from the Stitched Rounded Rectangles die (the largest one) then die cut a few hearts from that panel and in laid a few die cut hearts from the Be Brave patterned papers. Next, I die cut the "Happy" from gray cardstock three times and layered them. I added the "We are" sentiment in black and the "For You" sentiment heat embossed in white. I added a few more hearts and some clear sequins to finish the panel and then popped it up on the card base.
The sentiments in the Happy For You are so fun and versatile for several occasions or just an everyday card to make someone smile.

Thank you so much for stopping by!
Make sure to join the current
Pink and Main Challenge: School.
I hope you have a wonderful day!! 

Other Supplies Used:
Paper- Solar White card stock (Neenah), Gray and Navy card stock (Recollections)
Ink- Onyx Black Versafine ink, Versamark ink with White embossing powder (Ranger)
Other- Heart dies (Amazon), Sparkling clear sequins (Pretty Pink Posh), Crystal Clear Sparkle Pen (Spectrum Noir)

Hi Everyone!
Today I am sharing a project for Pink and Main stamps and dies.

(This blog post contains affiliate links. Compensated affiliate links used when possible at no extra cost to you. I just receive a small portion of the sales through your purchase. So Thank You!!)

I used one of the new sets being released next week,
called Sticky Note.
The images and sentiments in this set are just so fun!
You will love them!


I stamped the cute cactus and sentiment in black ink on watercolor cardstock, then used a few Zig Clean Color brush markers to color in the cactus and added a little water wash to move the colors around. Next, I trimmed the panel down and added a strip of patterned paper from the Spring Color Pop 6x6 paper pad to the left edge and adhered this panel to the white card base. I finished the card off with a few enamel dots.


Thank you so much for stopping by!
Make sure to join the current
Pink and Main Challenge: School.
I hope you have a wonderful day!! 

Other Supplies Used:
Paper- Watercolor paper (Tim Holtz), Solar White card stock (Neenah)
Ink- Versafine Onyx Black ink
Other- Enamel Dots (Recollections)

Hi Everyone!!
Today the Trendy Twine Gals, Helen and Sukie are celebrating a design team milestone of 5 years!! So I was asked to be part of the celebration as a friend and Trendy Twine DT Alumni.
Congrats Ladies!! 

For the cards, I decided to copy and replicate with my own style a card from Helen and Sukie.

The first card is for Helen, and I used Lemon Tart Trendy Twine on the card and some bright patterned papers and a die cut flower with a bold sentiment. I was inspired by Helen card design and papers.

First, I die cut the green patterned paper with a stitched rounded rectangle die (Pink and Main) then stamped the sentiment from the Simply Fabulous Sayings stamp set (My Favorite Things) in black ink. Then I added some Lemon Tart Trendy Twine around the panel and finished with a triple bow. Next, I layered the green panel and the flower panel to a white card base. Then I added the die cut and layered flower and a few sparkly enamel dots and that finished the card.


For Sukie's card,
I was inspired by her tag and butterflies. 

I used a new product from WPlus9- Large Butterfly Frame die and die cut it several times to layer. I colored the inside of the butterflies with some pink copic markers for simple shading then added some sparkle pen for shimmer. To layer behind the die cut panel, I used some pink grid patterned paper. I wrapped the Pinkberry Sorbet Trendy Twine to the right side and finished with a hand cut tag with a 'Celebrate you!' sentiment from My Creative Time in black ink. I added some of the same pink copics to the edge of the tag and added a Pinkberry Sorbet bow with long tails. To finish it off, I added some sparkling clear sequins in 4 and 6mm sizes.


Close up of all that SPARKLE!!

Congrats Again to Helen and Sukie!!
Make sure visit their blogs and get inspired!!
Don't forget to visit the Trendy Twine Blog to see all the cards made for these two amazing ladies!
Have an amazing Day!


Hi Everyone!
Today I am sharing a project for
Pink and Main stamps and dies.

(This blog post contains affiliate links. Compensated affiliate links used when possible at no extra cost to you. I just receive a small portion of the sales through your purchase. So Thank You!!)

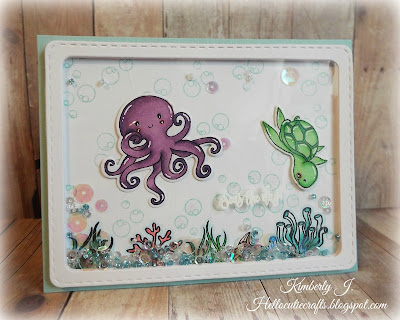
I made a shaker card using the new Seas The Day stamp set and the coordinating Seas The Day dies.
I started the card out by stamping, and copic coloring the cute Octopus and Turtle from the set, along with the starfish and some coral and greenery.
Then I die cut the Octopus, Turtle and starfish. 
Next, I die cut several frames (about 10), made with the two largest Stitched Rounded Rectangles Dies, to create a window for the shaker. I also die cut two of the largest Stitched Rounded Rectangles for the background and the inside of the card. Next, I suspended the Octopus and Turtle inside the shaker frame using some clear thread, they can move around just a bit. I stamped the bubbles on the background using some coordinating ink. Then I added the background panel to a A2 card base, followed by the shaker frame with the suspended Octopus and Turtle. Next, I took some Heat Resistant Acetate and embossed the "Seas the Day" sentiment in white from the set. I added some sequins and seed beads to the shaker window before layering the acetate and two more frames on top of that.

The Octopus and Turtle move around the shaker card
just a bit, its a really fun card.

The sentiment is a little hard to see in pictures, so here is a close up of it. I hope you were inspired today!! Shaker cards are so much fun and the possibilities are endless!! 

Thank you so much for stopping by!
Make sure to join the current
Pink and Main Challenge: Red, White and Blue.
I hope you have a wonderful day!! 

Other Supplies Used:
Paper- Pool Party cardstock (SU), Solar White 80lb. cardstock (Neenah), Heat Resistant Acetate
Ink- Pool Party (SU), Versamark ink, White Embossing powder (Ranger), White gel pen (Sakura), Copic markers
Other- Sequins- 4mm Sparkling Clear (Pretty Pink Posh), Iridescent (Darice), Seed Beads, Clear Thread, Crystal Clear Sparkle Pen (Spectrum Noir)